How to Use Graduation Planner
Graduation Planner is a tool within Minnesota State Student Planner that uses the most up-to-date information available from the student record system and Degree Audit, including transfer and in-progress courses.
Plans can also be built from multiple program audits, allowing you to add minors, concentrated studies, etc.
Create a Plan from a Degree Audit
To create a plan directly from your Degree Audit, select the Plans tab in the Student Planner menu to get to the Manage Plans page.

On the Manage Plans page you will see the Program and Catalog year listed that has the Rank of 1 on your student record.
- If your Degree Program is Undecided in your student record, the program listed will be ‘No Declared Program’ and the catalog year will be the current term.
- To change your major or program, contact your registrar/student records office.
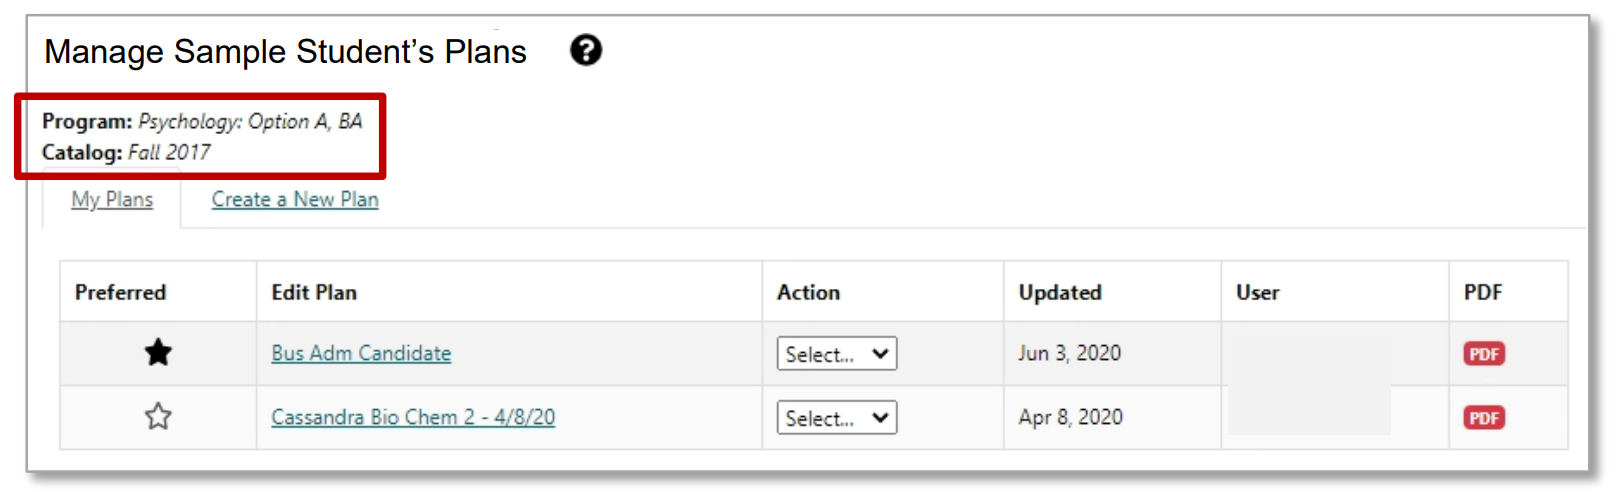
My Plans
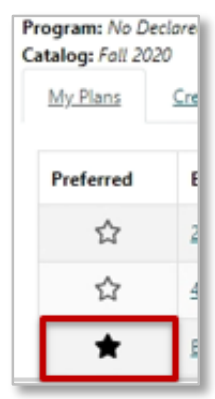
The My Plans table includes all the plans that have been created for that student. In My Plans you can mark a plan as Preferred select a plan to Edit, and select from additional options under the Action dropdown menu.
Preferred
Only one plan can be marked as Preferred. The filled star icon indicates which plan is the Preferred plan. The Preferred plan is the plan that can be Locked/Approved and is also the plan used for the data in Reports.
Edit Plan
To open the plan you want to edit, select the plan name or Edit Plan under the Action column.
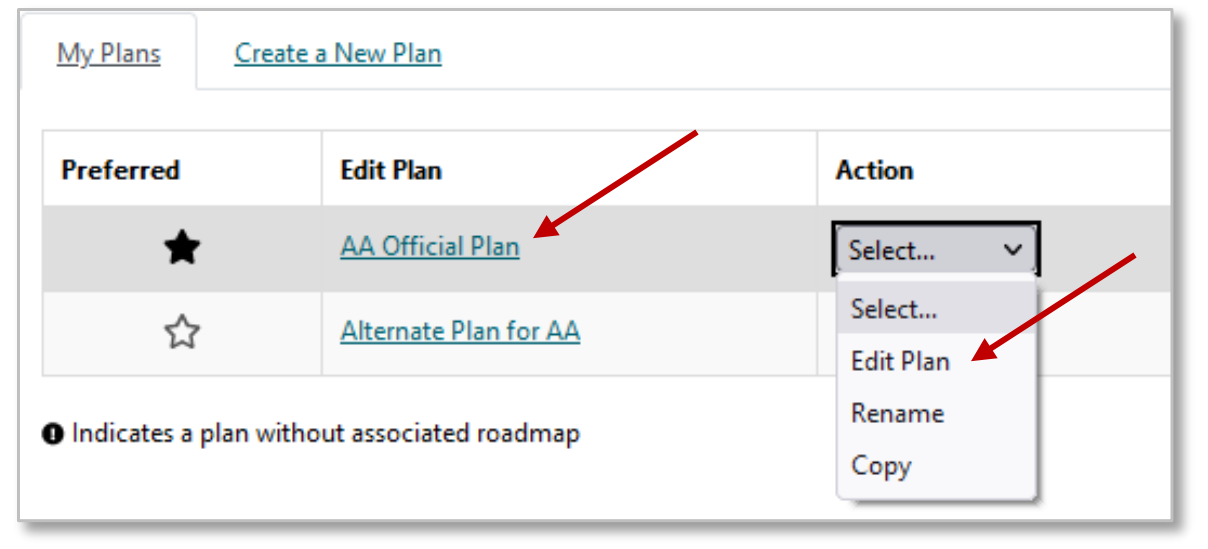
Action
Select the Action you want to perform for that plan, from the dropdown list of choices:
- Edit Plan - opens the plan so you can edit
- Rename
- Copy
- Delete - this choice is not available for the Preferred plan
NOTE: Students start with no plans listed under My Plans. Once plans have been created, all plans can be deleted except one, which will be your Preferred plan. You cannot delete your Preferred plan.
Naming Your Plan
In the My Plans tab, only one plan can be marked as Preferred, and many different plans can be created, so it can be helpful for the plan name to include specific information about what is included in that plan.
While names like "An awesome plan" and "My Plan" are possible, the name "‘Business TP, AS and Acct, Cert catF23 start S24 2yrs XYZ v.1" includes information that helps the viewer know more about the plan.
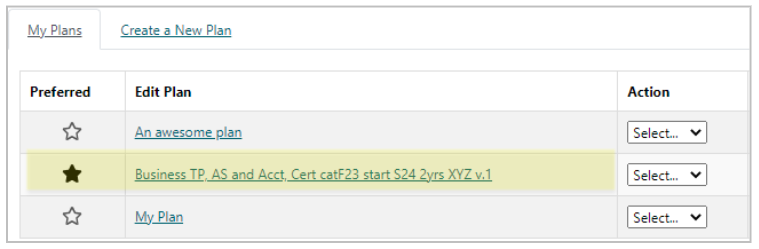
Helpful information to include in plan names:
- the name(s) of program(s),
- catalog year and term,
- plan start year and term,
- length of plan,
- initials of plan creator, and
- plan version.
Plan names are limited to 64 characters and cannot contain ", &, <, >.
Ask your advisor if your college or university has a naming conventions, requirements, or recommendations for naming your plans.
Create a New Plan for a Declared Program/Major
- Select the Create a New Plan tab.
- Enter Plan Information: Plan Name, Term and Year in which the Plan should start, and Years to Graduation.
- Select Add Plan.
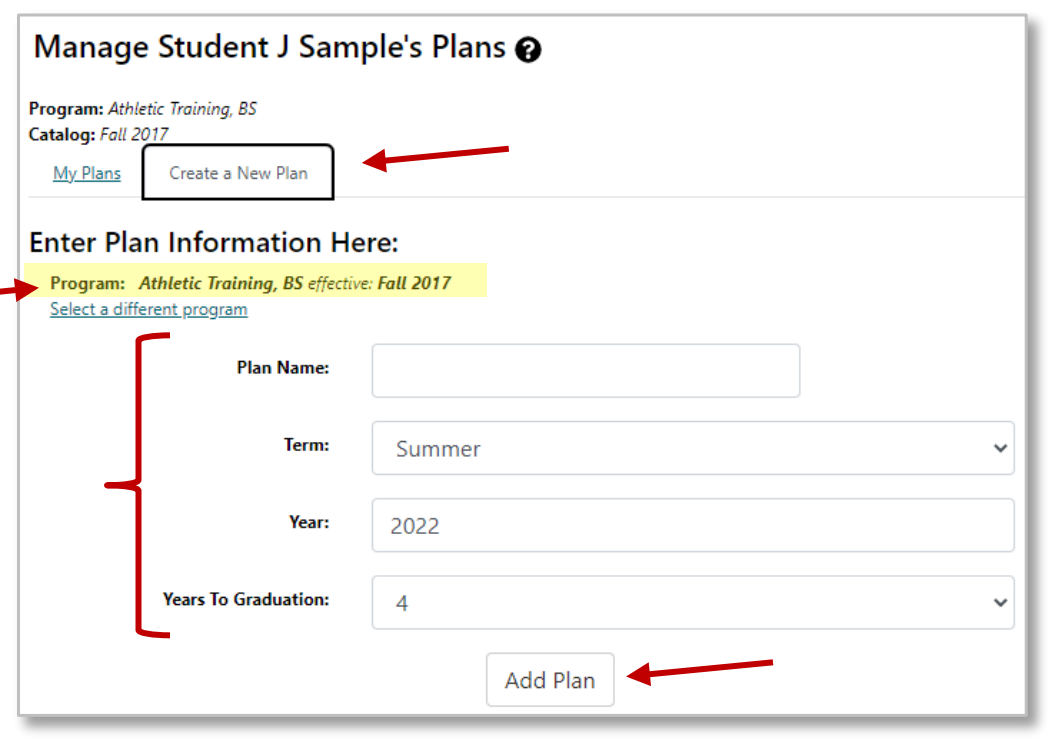
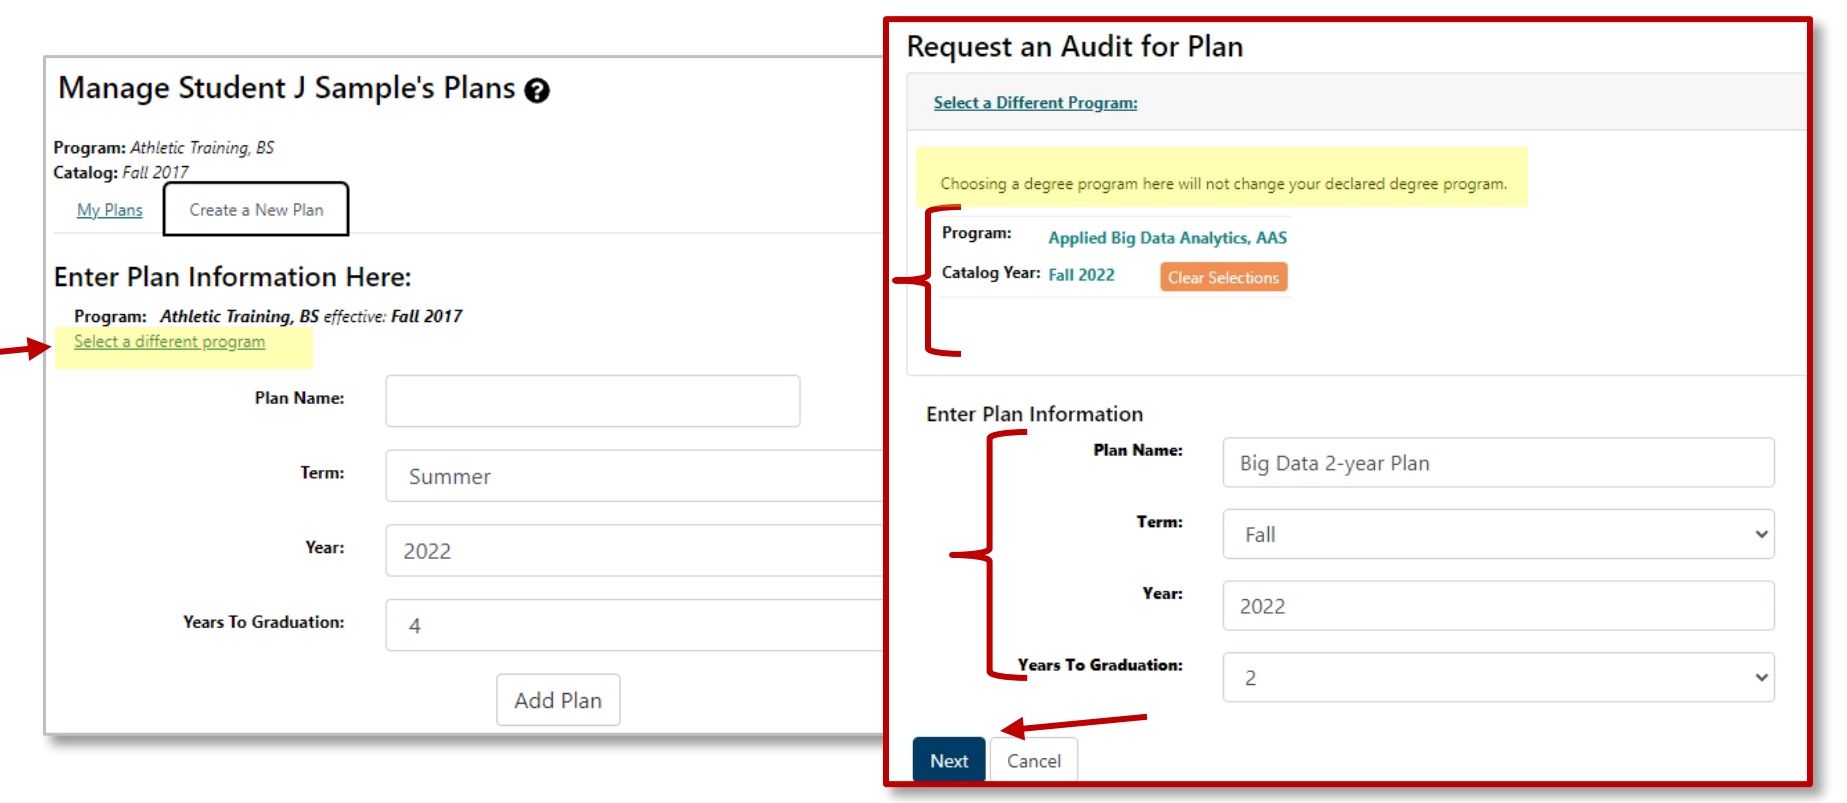
Create a New Plan for a Different Program/Major
- Select the Create a New Plan link tab.
- Select the Select a different program link under your Program. It will open the Request an Audit for Plan page.
- Select a Program and Catalog Year from the drop-down menus.
- Enter Plan Information: Plan Name, Term, and Year in which the Plan should start, and Years to Graduation.
- Select Next.
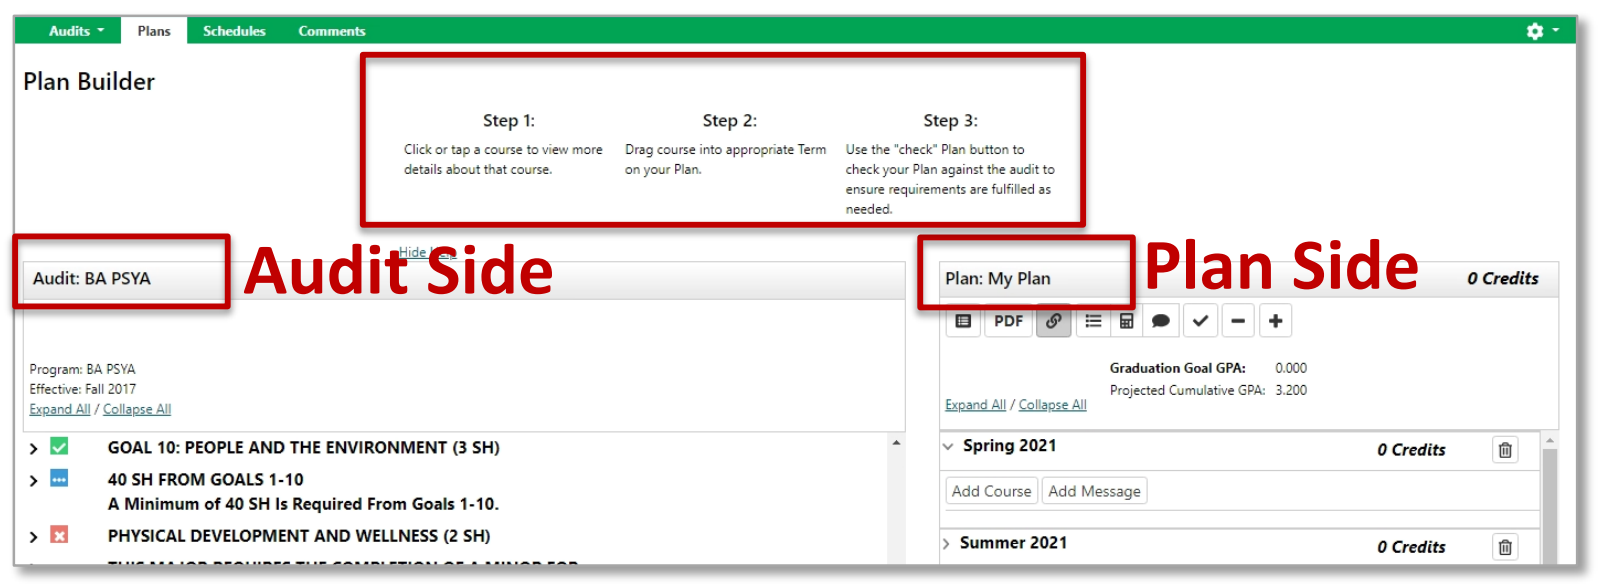
Plan Builder
- Select a course to view more details about that course.
- Drag the course into the appropriate Term on your Plan.
- Use the ‘check’ button to check your Plan against the audit to ensure requirements are fulfilled as needed.
Ways to Add Courses to a Plan
There are a few ways to add courses to your plan:
- Select course on the Audit side (left side) to open Course Catalog Details from your degree audit, Select Term from the dropdown menu, and select select Add Course.
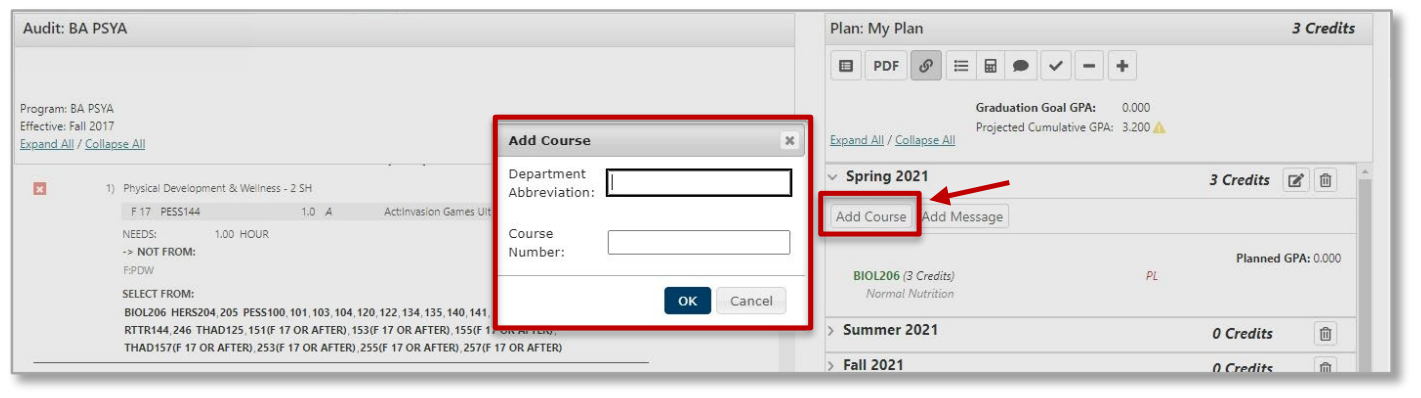
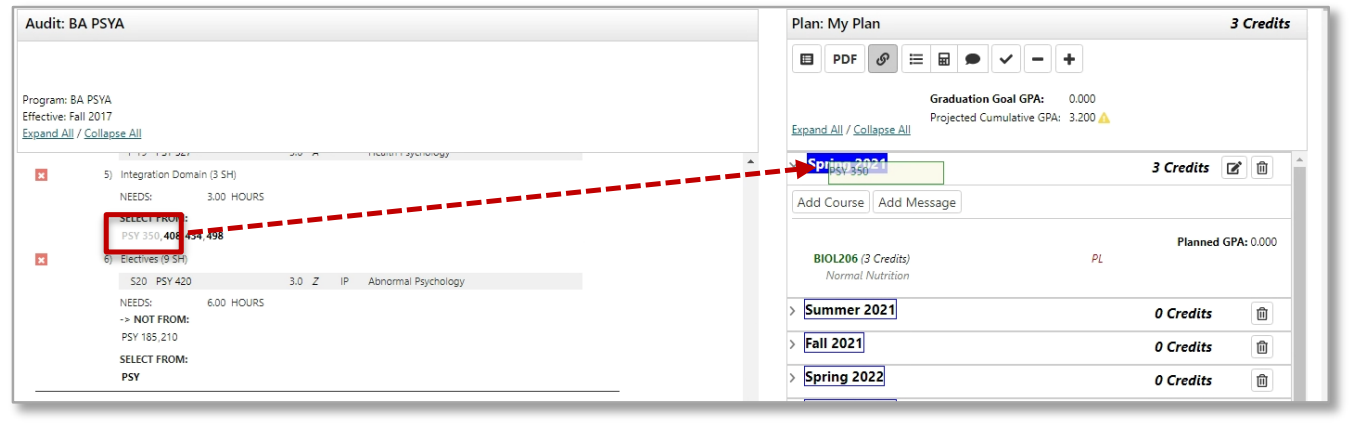
- Select and drag the course from the degree audit and drop it on the term.
- Select the Add Course button under any term. Enter course department and number.

Courses can also be moved from one term to a different term. Continue adding courses until you are done creating the plan.
Check the Plan
Select the checkmark icon at the top of the plan to check planned courses against the audit.

Check against the degree audit to make sure requirements are being fulfilled:
- When a plan is checked, it validates against the audit.
- It’s a good idea to check often to make sure courses are applying where you intended.
- The audit is rerun to reflect how planned courses apply to your program.
- Make sure you are satisfying program requirements and where planned courses may be completing more than one program requirement.
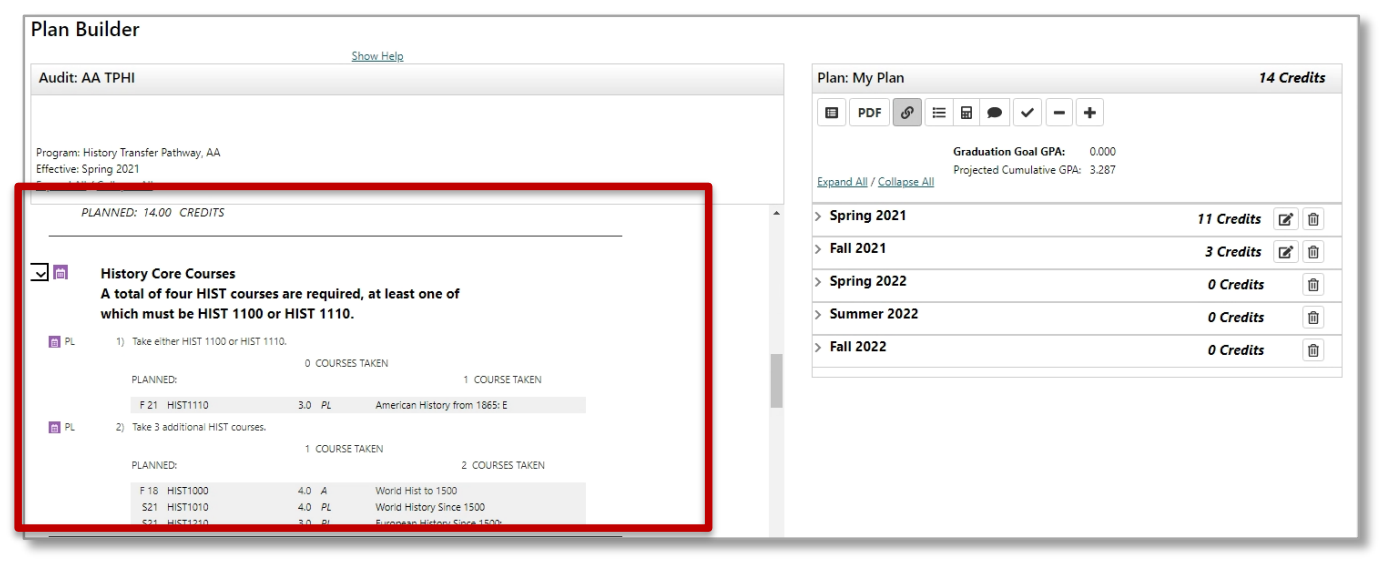
Planned courses will display as PL in purple on the Audit Side.
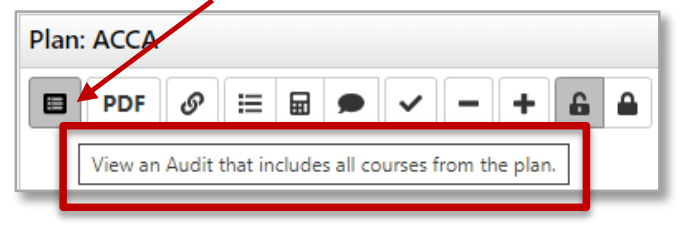
To view a Degree Audit that includes all courses from the plan, select the first icon in the menu. This opens the audit in a new tab, allowing you to continue planning while viewing an audit.
Editing a Plan
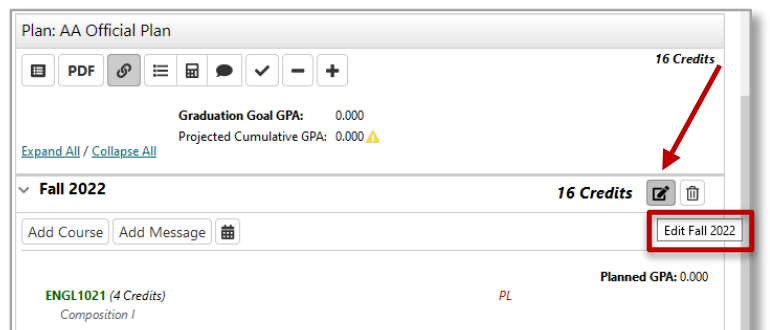
On the term line, select the Edit Term button on the right side to open the edit functions.
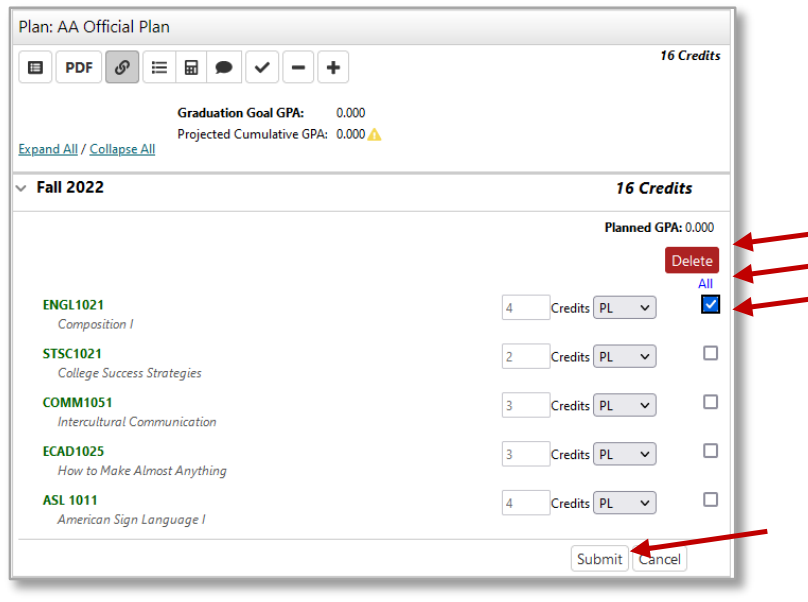
Removing Courses From Your Plan Term
- Check the box to the right of the course(s) that you want to delete.
- Select All to delete all courses in the term.
- Select Delete. You will be prompted to confirm the deletion.
- Select Submit to save your changes.
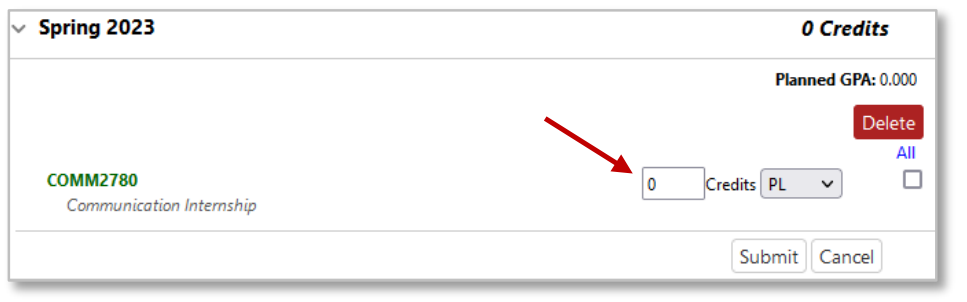
Course with Variable Credits
- Variable credit courses shows as zero credits on a Plan.
- Edit Term to enter the correct number of credits.
- Select Submit to save your changes.
Completed Audit Requests
Every time a plan is opened, a degree audit runs for the plan that is opened. When you go to the Manage Audits area in the Audits tab, the degree audits that were run in Graduation Planner will display the planned course icon and contain the word ‘planner’ in the Run By column.
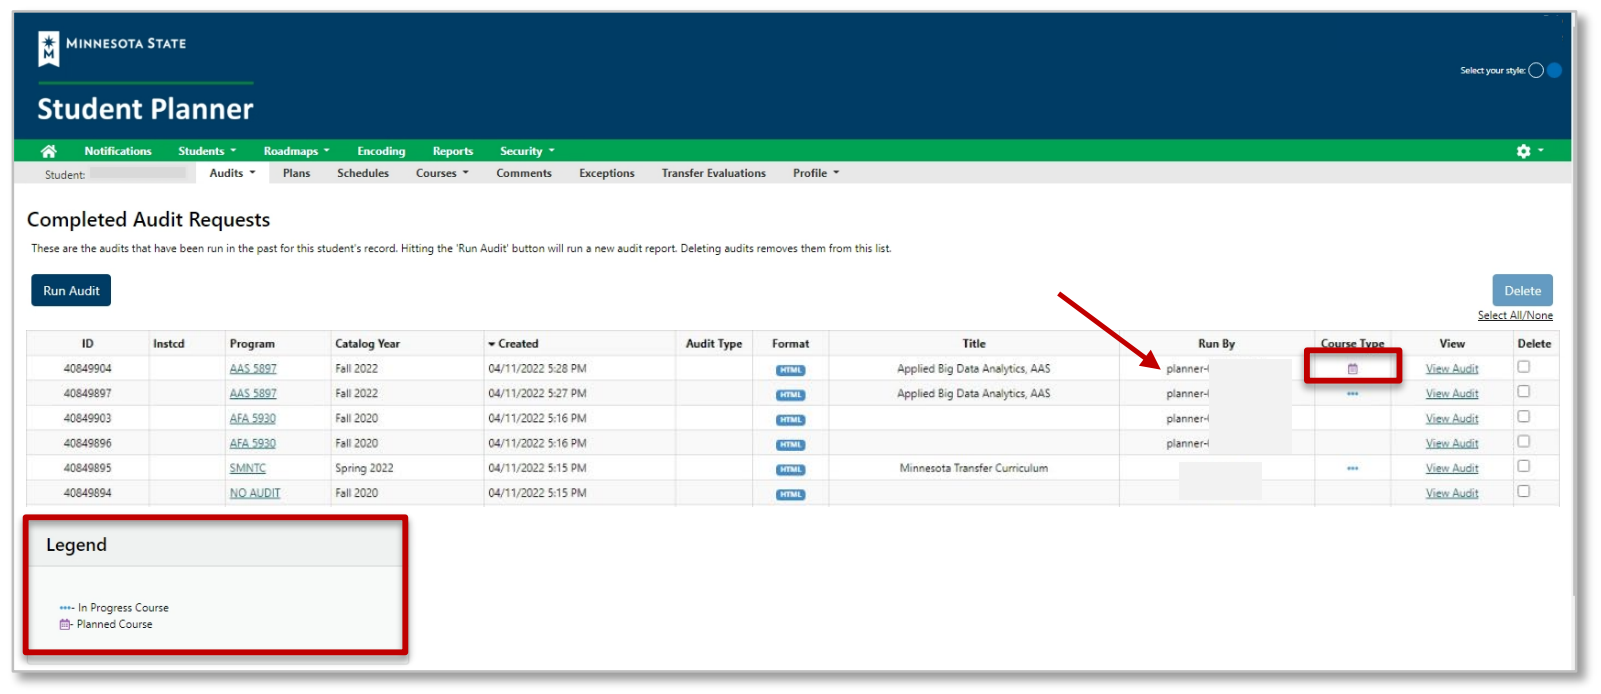
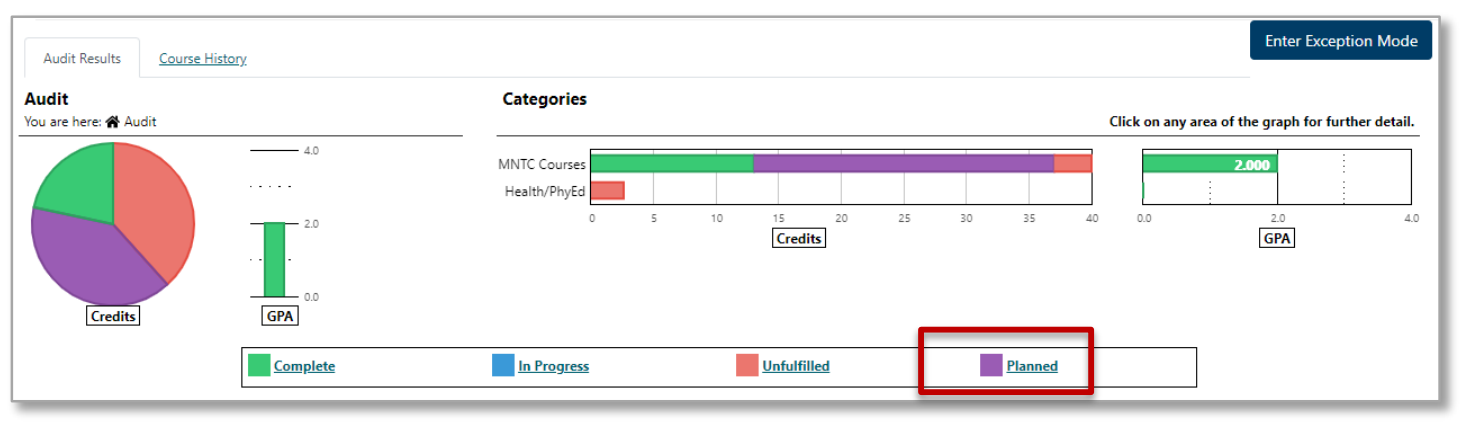
When you open an audit that contains planned courses, the planned courses will display in purple.
Notations on the Plan and Course Catalog Details
If a course displays with a red circle with a minus it is an alert there may be an issue with planning this course. Hovering your cursor over the red circle will give you a reason.
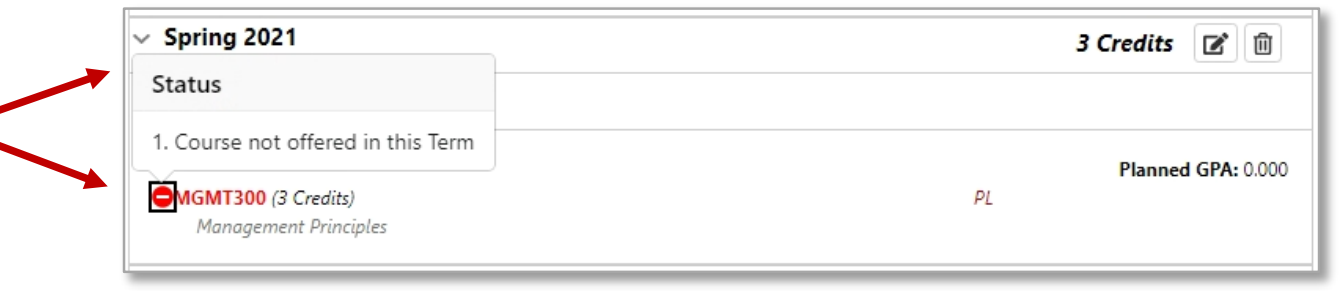
In this example MGMT 300 displays as not offered Spring 2021. This may be because:
- the school has not rolled the schedule for that term yet or
- the course will not be offered Spring 2021
Select the course to open the Course Catalog Details for more information.
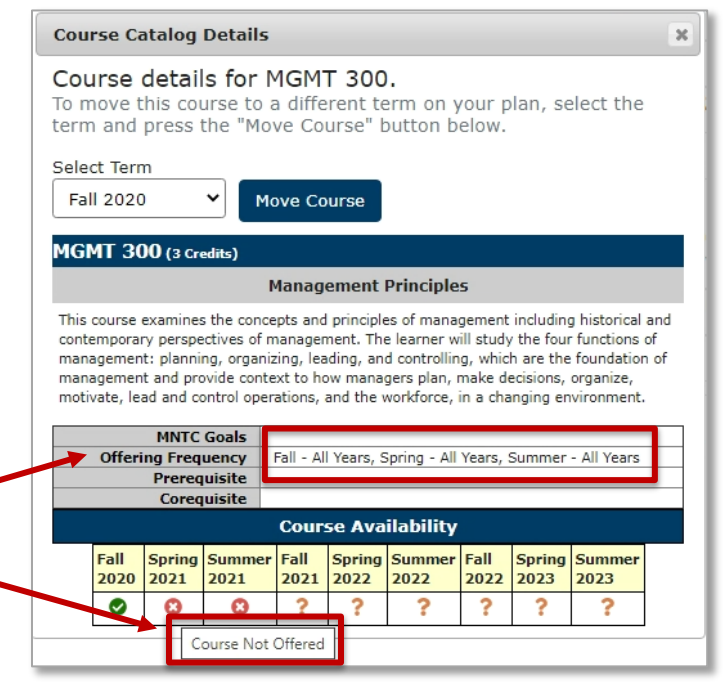
Course information displaying in the Course Availability grid reflects which courses are on the rolled course schedule in eServices for the term listed.
If available, using Offering Frequency information can help you know in which term(s) the course is usually offered. In this example, Offering Frequency tells us that the course is usually offered Fall – All Years, Spring – All Years, and Summer – All Years.
It was known that the school had not yet rolled the Spring 2021 schedule, so the course was left on the plan. Every time a Plan is opened, Course Availability is updated and reflected on the Plan and in the Course Availability grid, so when the schedule has rolled, this will update. View Courses & Registration in eServices to verify the availability of a course.
Prerequisites and Corequisites
When a Prerequisite or Corequisite is both Enforced and Displayed in curriculum management it displays in eServices in Course Details under Prerequisites (Courses and Tests).

Prerequisites and corequisites in our system are very complex and can include several kinds of test scores and multiple measures which is great for students. Unfortunately, because of our complexity, prerequisite and corequisite functionality does not work in the Plans application.
When a Prerequisite or Corequisite is both Enforced and Displayed, a message will display in Course Catalog Details referring the user to the most accurate source of information which is eServices: “ See Course details in eServices for Prerequisite information.”
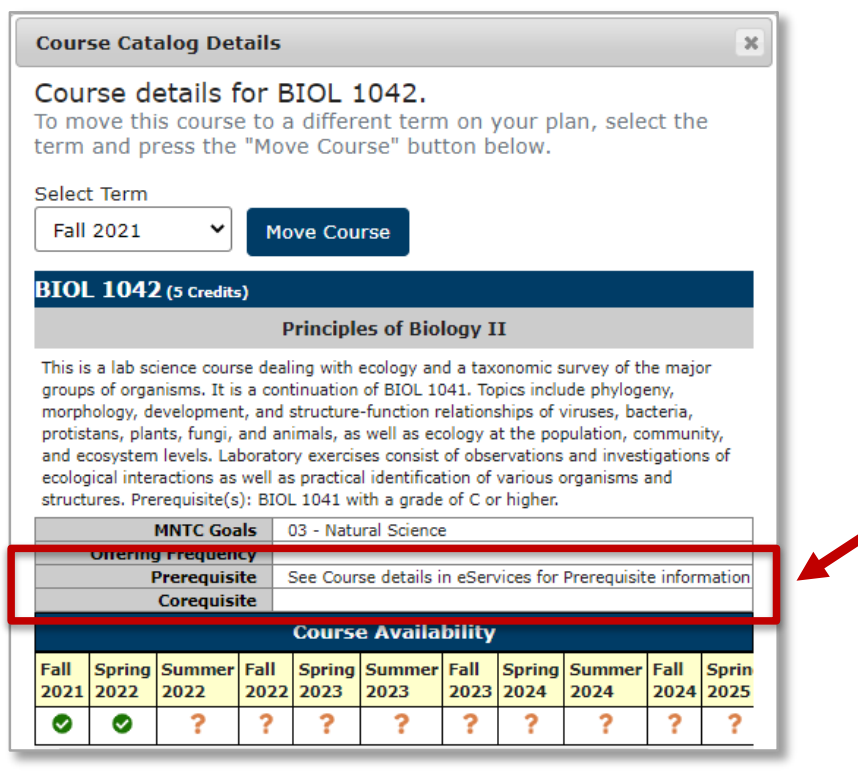
Prerequisite information may also be included in the Description. If it is, it can be seen in the Course Catalog Details in the Minnesota State Student Planner and the Course Details in eServices.
Approved Plan and Approved Term(s)
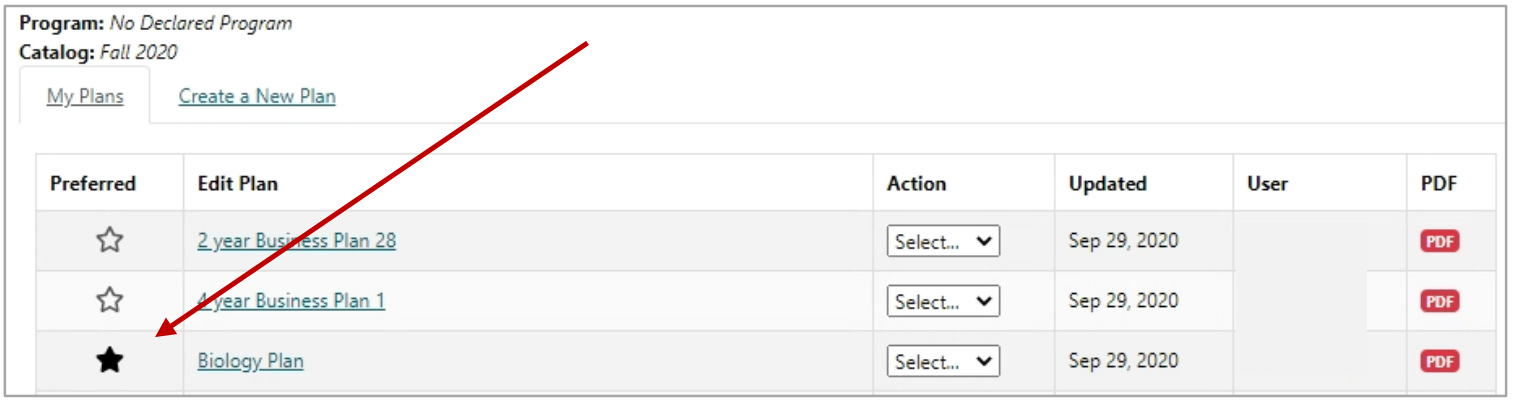
On the Manage Plans page:
- Some schools use the Approval option. Approving/locking can be activated by staff/faculty/advisors.
- Preferred Plan: The plan that the student will follow to complete their program. Approving/Locking can only be done by staff on the Plan that is marked as Preferred.
Approved Plan
The notation Plan Approved and additional information displays on the Plan Side of Plan Builder in the approved plan.
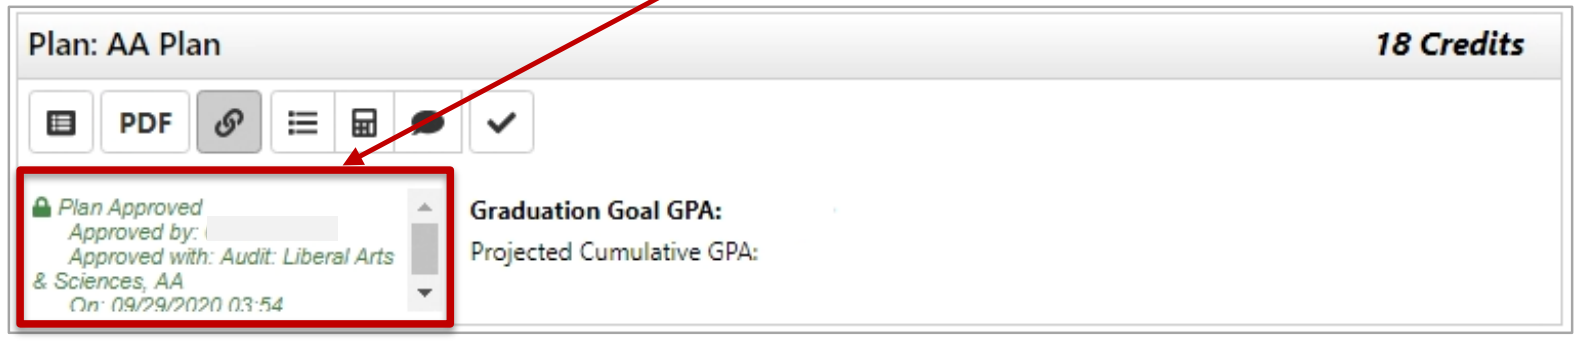
An approved plan is indicated by the locked icon in Manage Plans.
![]()
Approved Term(s)
The notation APPROVED displays next to the approved term on the Plan Side of Plan Builder.
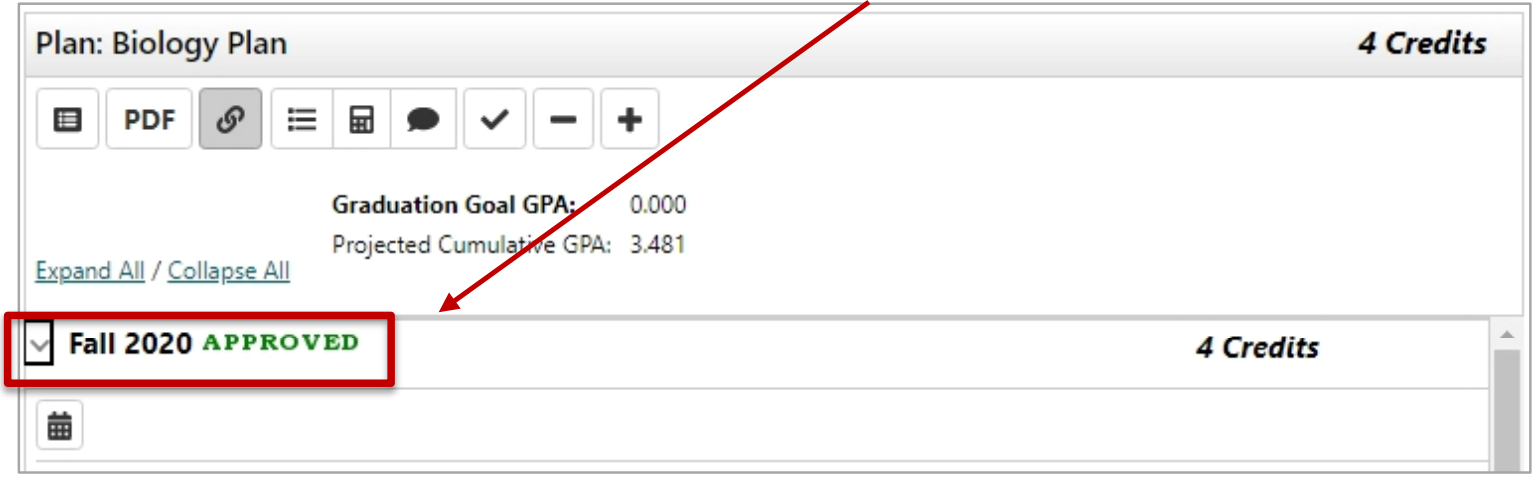
If a term or terms have been approved but the plan has not been approved, there is no indication of an approved term on the Manage Plans page.
Icon Descriptions
Legend for Icons Used in Plan Builder
| Icon description | Icon meaning |
|---|---|
| Page | Course List |
| Blue circle with an "i" | Not used in our configuration. Students are directed to “See Course details in eServices for Prerequisite and Corequisite information.” |
| Green checkmark | Completed Course |
| Three green dots | In Progress Course |
| Red X | Incomplete Planned Course |
| Red minus symbol | Completed Course, No Credit |
| Red circle with white dash | Alerting possible issue with course |
| Green box with white checkmark | Complete |
| Purple box with white calendar | Planned |
| Blue box with three white dots | In Progress |
| Red box with white X | Unfulfilled |
Plan Side Icon Descriptions
![]()
| Icon description | Icon meaning |
|---|---|
| Dark gray square with a light bulleted list. | View an Audit: This audit opens in a new tab and allows you to continue planning while viewing an audit. |
| PDF text. | View PDF: Displays in-progress plan as PDF. |
| Link symbol. | See Associated Roadmap: When the icon is gray, there are no associated roadmaps. When the white icon is selected, it turns gray and lists any associated roadmap(s). To return, select Associated Roadmaps again. |
| Bulleted list symbol. | See Completed Courses: Displays plan on left and completed coursework on right. To return, select Completed Courses again. |
| Calculator | GPA Calculator: Displays plan on left and ability to plan GPA on right. To return, select GPA Calculator again. |
| Chat bubble symbol. | Comments: Displays plan on left and allows you to read/make comments on right. To return, select Comments again. |
| Checkmark symbol. | Check Plan against Degree Audit: Validates plan against audit and checks term availability. |
| Minus symbol. | Remove All Courses: Removes all planned courses. |
| Plus symbol. | Add Term to Plan: Adds a new term to a plan. |